Photobucket Photobucket Photobucket Photobucket Photobucket Photobucket Photobucket Photobucket

Tuesday, December 27, 2011

Leopard Pumps

OK, so I had been dreaming about these shoes for a while and I just had to go for it. They are basically everything you would want in a heel and can make an old outfit into new!


Although, I did have a little trouble with them at first now they are perfect! 
I ordered them off of piperlime.com for $100.00. I got a few discounts here and there with them being $130.00 originally.

 So here is the story: The first time I ordered them the leopard print was off...like they didn't match. I thought I was going crazy because I kept staring at them to see if I should send them back or not. So, I took pictures and sent them out to my closest friends to get some opinions. The verdict was to send them back for another pair. So I did and got these and they are GREAT! I am totally happy with my purchase now. I would have not worn them as much as I do now if I didn't feel comfortable with uneven spots!!
xoxo 

Friday, November 18, 2011

Catch Up

Okay so I have seriously not posted what's been going on in my life... 
Life just gets too busy to sit down and blog about it. So many things going on this summer/fall so I will try to describe it with some pictures to slim down the story time. 


Zane and I at our friend Dee Dee's wedding. She was a stunning bride and we had the best time. 


One of my bestest buds A. Popsicles by the pool for us every Thursday this past summer. 


Trampoline time with Anna Bell. 


Civil Wars concert at the Shoals Theatre with Victoria.(gotta love the nerd glasses)


I had the best opportunity to be a part of a short film crew thanks to Janae. So thankful she always thinks of me!


Got lucky enough to go to a ton of concerts this summer..Katy Perry front row. Enough said. 
Candyfornia Dreams Tour.


My second Britney concert!!


Taylor Swift concert with Annastyn and Aunt Michelle. Annastyn=TaySwift#1fan


Spending time with my love. 


 One of my oldest friends Heather at her son Bryson's second birthday party.(he's getting so big)


Out and about with Jen.


 My big sister in Zeta. I've always looked up to her!


My bff at our lovely friend Whitney's wedding. So glad she found the man of her dreams and I was a part of her big day!


Maybe that will fill you in for a while and I will try to get better at posting in my diary section!
xoxo

Saturday, November 12, 2011

DIY fringe scarf

I discovered an awesome scarf idea and have to share it. 
It is really really cheap and easy! 
A perfect gift idea or project to do with a friend. 
What you need:
-scissors
-XL t-shirt 

I got my shirt in a size 3xl so it would be an extra big scarf! 
It was only $4.47 at wal-mart. 

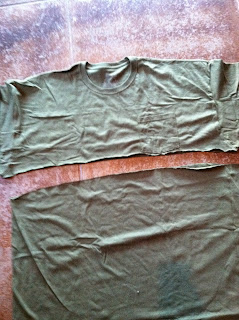
 First, cut the shirt straight across right under the sleeves. 


 This is what it should look like after you cut it across. 


 Then, cut strips up and down leaving about a five inch gap at the top. The gap is the base of the scarf that goes around your neck. 


 Be patient..it took me around twenty minutes to cut all my strips. After you cut then pull each strip and it makes it a little longer and skinnier. 


This is your finished product!! 
So cute,super easy and fringey!!
Happy Crafting 
xoxo

Sunday, November 6, 2011

Shoe Bow Ties

A while back I saw a pair of the cutest flats and I didn't buy them. Of course when I went back for my purchase they didn't have my size. I searched and searched and couldn't seem to find them so I decided to try to create the, to die for shoes for myself. 
Here are the Libby Edelman shoes in the Kendra style.
(these are my fav)

Here is what you need:
-Pair of flats (mine are from Old Navy $10)
-Measuring Tape
-Scissors
-Paper Clips
-Fabric (your choice of color)
-A pen (or a friend)

First, cut the fabric in strips. Use your measuring tape to measure 5inches wide and 25inches long. This makes for a BIG BOW, but that's what I like about the Libby's so much. 

Then I used a pen as a base to tie my bow. This is where the friend part comes in. I was alone so I had to make it work. All I did was tie my bow the way I wanted it to look on to the pen. 

I then attached on side of the paper clip to the knot of the bow and the other side to the front of the shoe. You can adjust the bow to be exactly the way want it. If you have some frayed edges just use to fray glue to hold them down. 


BIG
BIG
BIG


I LOVE them!!  I can even take the bows off if I want to use them on different shoes. Such an easy and inexpensive project. I guess it turned out to be a good thing that I couldn't find those shoes I wanted so badly.
xoxo

Saturday, November 5, 2011

Red Cropped Pants

Red Cropped Pants are what's hot right NOW
I must get my hands on a pair asap. After seeing them in every fashion mag for the past couple months I have been on the search for my pair.

Here Rachel Bilson was spotted wearing hers with leopard platforms and a floral top. I have to say I am a fan of mixing a fur print with flowers. The red cropped pants just give it what it needs for the perfect outfit. 

Here are a few I found on my red cropped pant search: 


These are from Topshop.com for $75.00. One of the cheapest I found and look pretty comfortable. I think these are for a more casual type setting, being made with 100% cotton.

These have a brighter color for a better pop! Versace from Net-a-porter.com for $795.00. These pants give a tailored fit and are made with stretch fabric and a high waist. More for an evening dinner and a perfect match with sky high heels. 


This is probably my favorite pair! From Jcrew.com for $118.00. Made with a lightweight wool they can be worn all year long. Afordable and available in almost any color. Made for every body type and hits right above the ankle. These are fitted through the hips with a skinny cropped leg for the perfect fit. My top pick and hopefully a purchase in my near future!

Now go out and get your red pants! 
xoxo


Saturday, October 15, 2011

Fall Wreath

I'm usually not a wreath kind of girl, but I was obsessively pinning on pinterest (if you aren't a member you should so join!) and found some really creative styles. So (as pinterest usually does) all these fall projects sparked some ideas. I took what I liked from certain wreaths and made it my own. It adds the perfect touch to my front door and I can keep it up through Thanksgiving. 
Here is what you need:
-1 yard Burlap 
-1/2 yard of orange fabric
-1/2 tan/mustard fabric
-Wreath Base
-Hot glue
-Straight Pins
-Door Hook 


First, you need to make your fabric rosettes.There are tons of tutorials online to show you how. I just ties a knot at the end of a strip of fabric and wrapped it around, hot gluing every 1/2 inch or so. This takes time so be patient with yourself. Once you get the hang of it then you should be able to speed it up. 


(Zanes toes ^^^ in his ugly shoes)
(these don't look like different colors but they are. the lighting in my room was dim)


I then cut out strips of burlap to put over the base of my wreath. I didn't really measure or anything just totally guessed. 

I hot glued the burlap on to the wreath in gathers so it would have a ruffle look when finished. I used two layers because one just wasn't enough. 

After I glued the burlap on to the wreath base I pinned my rosettes over it with the straight pins.(this way if I want to use them again later I can)I couldn't decide what bow to use for the top, but a bow is a must!! So first I tried just some extra burlap, but I didn't really like it. 


Then I found some old fabric I had from a previous project, but it clashed with my rosette colors.. Too much orange. 


Then I looked in my closet and found an old scarf that I never wear, tied it on top and it was huge a perfect. The bow can never be too big!!


(I have never hung a wreath so after I took this picture I put it a little higher)

This project is super easy and cost me only about $15. Have a happy football filled Saturday and go out to get your supplies for your front door wreath.
xoxo

Thursday, October 6, 2011

Coasters

I know I have been slacking lately in the craft department, but I'm here to make up for it. I have been in need and on the search of the perfect coasters. As I was blog reading Saturday I found the cutest idea on how to make my own. This way you can make them personal and exactly the way you want. It is so easy anyone can do it.  
Here is what you need:
-Paper of your choice (I chose four different kinds).59cents each
-4X4 ceramic tiles .16cents each
-Mod Podge $4.99
-Felt Stickers .99cents for a package
-Clear Spray Paint $4.99


First cut the paper out into squares to put on top of the tiles.
And don't forget to stick your felt stickers underneath so they don't scratch the table.   
Then put the Hod Podge over the tile and stick on the paper. After it dries put two layers of Hod Podge over the paper.
It might take a while to dry, but once it does take it outside for some clear spray paint. Just lightly spray each tile two times. 
Once they are all dry you're ready to use them!! Super cute for gifts and SO EASY to create. Have fun and make yours to fit your personality like I did. 
xoxo